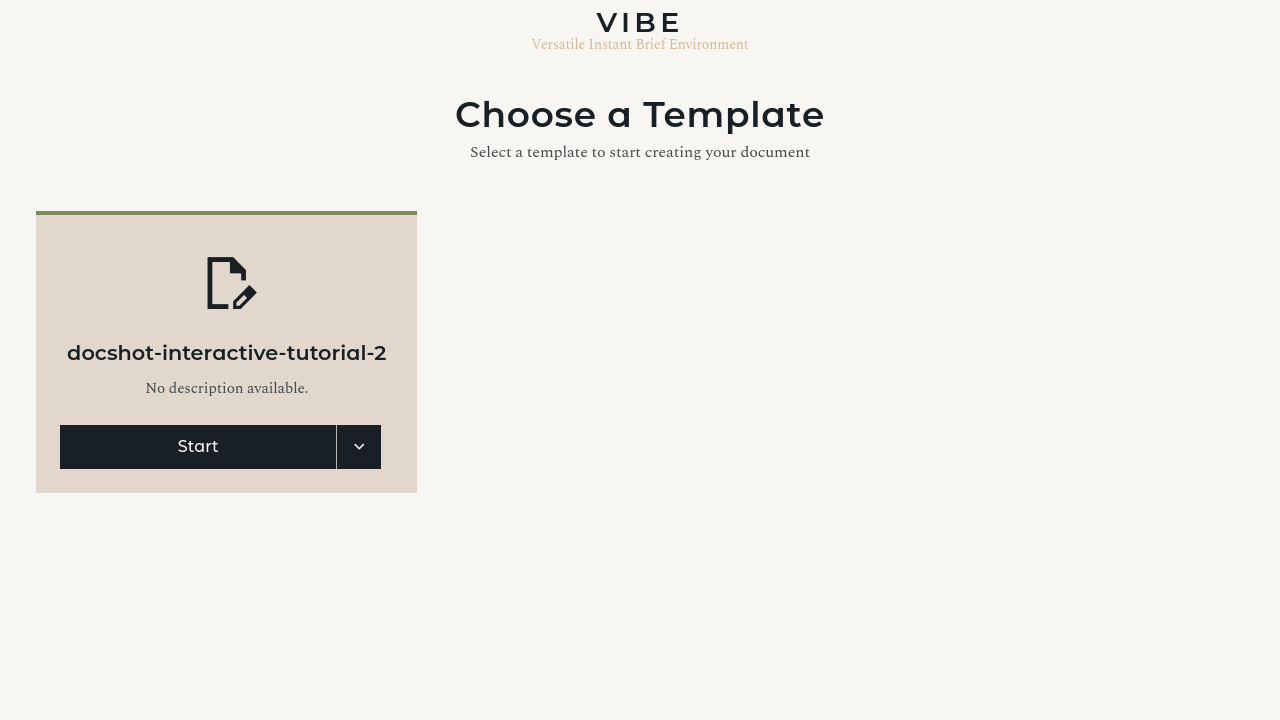
Building a VIBE Template: A Step-by-Step Tutorial
Welcome to the comprehensive tutorial for VIBE. This guide will walk you through building a complete Service Agreement template from the ground up. We will start with the simplest possible document and, step by step, add new features to make it more powerful and dynamic.
Why VIBE (Real-World Fit)
VIBE is a good fit when your documents:
- Have lots of optional clauses or branches (you only want to ask the questions that matter).
- Reuse the same data in multiple sections or across multiple documents.
- Need to stay aligned with the actual template logic, not a separate form definition.
- Must feel fast for end-users, even when the underlying document is complex.
By the end, you will have hands-on experience with:
- Basic and advanced question types
- Conditional logic (
{% if %}) - Dynamic follow-up questions
- Static validation and test scenarios
- Handling lists of items (
{% for %}) - Reusable data structures (
definitions) - Modular document sections (
components) - Automatic calculations (
computables) - Generating separate appendix documents
Let's begin.
Step 0: Before You Start
Installation
VIBE requires Python 3.12 or later. If you don't have Python installed, download it from python.org and run the installer. Make sure to check "Add Python to PATH" during installation.
Once Python is installed, open a terminal (Command Prompt or PowerShell on Windows) and run:
Verify the installation:
Tip: If you work with multiple Python projects, consider using a virtual environment to keep dependencies separate. Create one with
python -m venv .venv, then activate it (.venv\Scripts\activateon Windows,source .venv/bin/activateon macOS/Linux) before running thepip installcommand above.
Your Project Folder
- Create a new folder on your computer. Let's call it
service-agreement-tutorial. - Inside that folder, create two empty files:
config.ymlandtemplate.md. - As we go through the tutorial, you will add the provided code snippets to these files.
Iteration 1: The Foundation
Concept: The absolute basics. We need a document that can greet a client by name.
Features: text question type, printing a variable {{ ... }}.
Step 1: Define the Question
First, we need to tell VIBE what question to ask.
questions:
  client_name:
    type: text
    label: What is the client's name?
    help: Please enter the full legal name of the client.
This defines a single variable, client_name, which will be collected using a simple text input box.

Step 2: Use the Variable in the Template
Now, let's use the answer in our document.
# Service Agreement

This Service Agreement is made between VIBE Industries and **{{ client_name }}**.
The {{ client_name }} is a placeholder. VIBE will replace it with the user's answer.
Step 3: See It Work!
You now have a complete, working VIBE template. To test it, you first need to make sure VIBE knows where to find it. In your main VIBE project, open the global config.yml and add the path to your service-agreement-tutorial folder to the TEMPLATE_SOURCES list.
Now, you can run two key commands from your terminal in the main VIBE project folder:
-
Validate the Template: Before running the server, it's a good practice to check your template for errors. The
validatecommand does a static analysis of your files. To validate your new template, you'll need to provide its unique ID, which is the name of its folder.If there are no errors, it will print a success message. If there are, it will tell you what and where they are.
-
Run the Development Server: This command starts the VIBE web application.
You will see output indicating the server is running, typically on port 5001.
-
Open the Interview: Open your web browser and go to the following URL:
http://127.0.0.1:5001/You should see your "Service Agreement" template in the list. Click it to start the interview.
Step 4: Understanding the Result
When you run the interview, VIBE reads your config.yml, sees the client_name question, and displays it as a form field. When you fill it in and VIBE generates the document, it replaces the {{ client_name }} placeholder with your answer.
You've just completed the fundamental loop of VIBE development: define a question, use it in a template, and see the result.
See also: Template Authoring Guide, Question Types Reference
Iteration 2: Dynamic Sections & Conditional Relevance
Concept: Documents often have optional sections. We'll add an optional Non-Disclosure Agreement (NDA) clause. More importantly, we'll add a question that only becomes relevant if that clause is included.
Features: bool question type, {% if %} block.
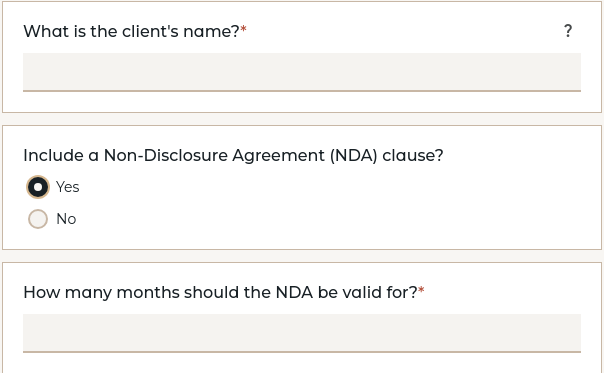
Step 1: Add the New Questions
We need two new pieces of information: whether to include the NDA, and for how long the NDA should last.
questions:
  client_name:
    type: text
    label: What is the client's name?
    help: Please enter the full legal name of the client.

  # New Question 1: A Yes/No choice
  include_nda:
    type: bool
    label: Include a Non-Disclosure Agreement (NDA) clause?
    default: false
    required: false

  # New Question 2: A number that depends on the NDA
  nda_term_months:
    type: number
    label: How many months should the NDA be valid for?
    min: 1
    max: 60
Step 2: Add the Conditional Block to the Template
Now we use an {% if %} block to make the NDA section optional.
# Service Agreement

This Service Agreement is made between VIBE Industries and **{{ client_name }}**.

{% if include_nda %}
## Confidentiality

Both parties agree to keep all proprietary information confidential for a period of **{{ nda_term_months }}** months following the termination of this agreement.
{% endif %}
Understanding Conditional Relevance
This is the central feature of VIBE. When you first run the interview:
- VIBE probes the template and sees the
{% if include_nda %}block. It asks theinclude_ndaquestion. - The question for
nda_term_monthsis hidden. VIBE knows it's not needed yet because it's inside a condition that is currently false. - The moment you answer "Yes" to
include_nda, the condition becomes true. VIBE re-probes the template, sees that{{ nda_term_months }}is now needed, and instantly makes its question appear in the interview.
You don't need to keep track of which questions to ask under which conditions - the template already contains this information, and VIBE makes sure to only ask questions that it needs the answer to.
What You Should See
- The NDA follow-up question appears immediately after you answer "Yes".
- The preview updates live as you answer questions.
- Only the questions that matter for the document appear.
See also: Template Authoring Guide
Iteration 3: Expanding with More Data Types
Concept: Let's add more standard contract terms using different kinds of questions.
Features: number and select question types.
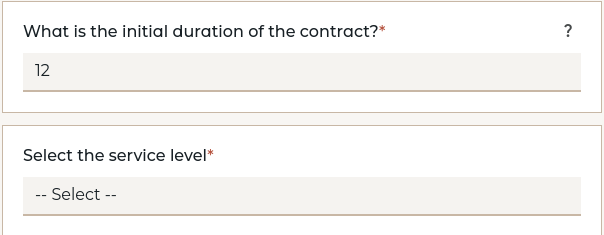
Step 1: Add Number and Select Questions
questions:
  contract_duration_months:
    type: number
    label: What is the initial duration of the contract?
    help: Enter the number of months.
    min: 1
    default: 12

  service_level:
    type: select
    label: Select the service level
    options:
      - Standard
      - Premium
      - Enterprise
Step 2: Use the New Variables in the Template
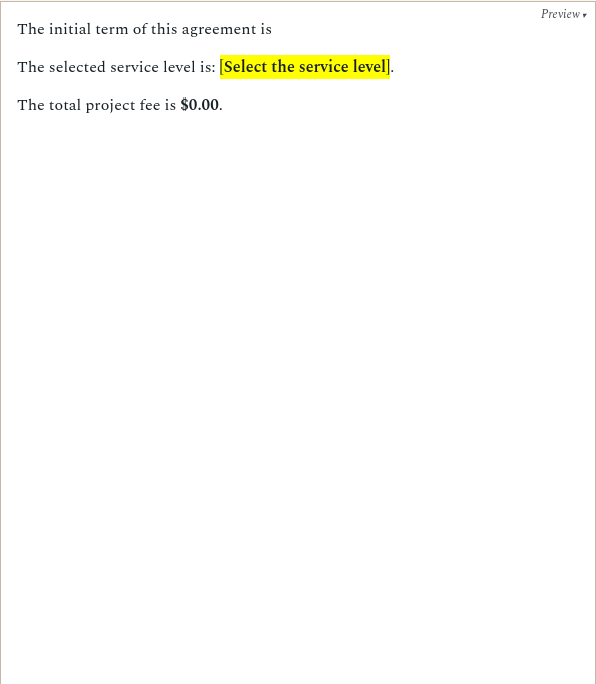
# Service Agreement

The initial term of this agreement is **{{ contract_duration_months }}** months.

The selected service level is: **{{ service_level }}**.
Now your interview will present a number input field and a dropdown menu, giving you more structured data to work with. Also note that you can give questions a default value which the user can keep or adjust as they see fit.
See also: Question Types Reference
Iteration 4: Fine-Grained Options with multichoice and followups
Concept: Let's offer multiple optional services. Some options need additional details from the user, so we'll use followups to nest related questions directly underneath the checkbox that triggers them.
Features: multichoice type, followups key.
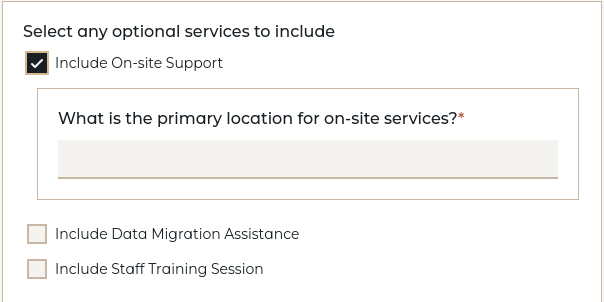
Step 1: Define the multichoice Question with Follow-ups
We'll add a multichoice question for optional services. The "On-site Support" option needs a location, so we list on_site_location as its follow-up. This tells VIBE to render the location question indented directly underneath that checkbox when it becomes relevant.
questions:
  optional_services:
    type: multichoice
    label: Select any optional services to include
    required: false
    options:
      - value: on_site
        label: Include On-site Support
        followups:
          - on_site_location
      - value: data_migration
        label: Include Data Migration Assistance
      - value: staff_training
        label: Include Staff Training Session

  # This question will appear nested under "On-site Support" when relevant
  on_site_location:
    type: text
    label: What is the primary location for on-site services?
Step 2: Use the multichoice Variable in the Template
A multichoice variable acts like a dictionary where each option value is a key and its value is true or false. To check if an option was selected, you must check its value: {% if optional_services['on_site'] %}
## Optional Services

{% if optional_services['data_migration'] %}
### Data Migration Terms
We will assist with the migration of existing data.
{% endif %}

{% if optional_services['staff_training'] %}
### Staff Training
A one-day training session will be provided at **{{ on_site_location }}**.
{% endif %}

{% if optional_services['on_site'] %}
### On-site Support
On-site support will be provided at the following location: **{{ on_site_location }}**.
{% endif %}
What You Should See
Run the interview. When you check "On-site Support":
- The
on_site_locationquestion appears indented directly underneath the checkbox, not at the bottom of the form. This is whatfollowupsdoes — it controls where the question appears in the interview for a more intuitive flow. - The template still controls when the question is relevant (through the
{% if %}block), butfollowupscontrols where it appears in the UI. - If you also check "Staff Training", VIBE knows that
on_site_locationis needed for that section too. The question remains nested under its follow-up parent, and both template sections will use the same answer.
The followups key works on multichoice, radio, and bool question types. See the Question Types Reference for the full syntax for each type.
See also: Question Types Reference
Iteration 5: Catching Mistakes Early
Concept: Our template now has conditional branches, multichoice lookups, and follow-up questions. Even in this small template, there are many places where a small mistake — a misspelled variable name, a stale option value, a missing {% endif %} — can break things. VIBE has two complementary tools for catching problems: static validation (checking the template files for structural errors without running anything) and test scenarios (verifying that specific answer combinations produce the expected document).
Think of it like a spell checker and a proofreader: validation is the spell checker catching typos and grammar errors instantly, while test scenarios are the proofreader reading through the whole document to make sure the content says what you intended.
Part A: Static Validation
Features: vibe validate command.
What Validation Catches
Let's deliberately introduce a bug. In template.md, change {{ client_name }} to {{ clent_name }} (a typo). Now run:
You'll see something like:
VIBE parsed the template, found a {{ clent_name }} expression, checked it against all declared questions and known variables, and determined that nothing called clent_name exists. The error points to the exact file and line number.
This matters because a template with validation errors will not load at all — the server will refuse to start the interview rather than silently produce a broken document. Running vibe validate gives you the same error with a faster feedback loop: you don't need the server running, you don't need to open a browser, and you see all issues at once.
Fix the typo and run validate again:
The Kinds of Mistakes Validation Finds
As your template grows, the static analyzer catches increasingly subtle problems:
-
Misspelled variable names.
{{ nda_term_month }}instead of{{ nda_term_months }}— caught immediately. Without validation, this would render as empty text and you might not notice until a real user generates a document. -
Stale option comparisons. Suppose you later rename the
service_leveloption fromPremiumtopremium(lowercase) in yourconfig.ymlbut forget to update{% if service_level == 'Premium' %}in the template. The conditional silently never matches — the entire Premium section vanishes. Validation warns: "Variable 'service_level' compared (==) with invalid literal 'Premium'. Allowed values: ['Enterprise', 'Standard', 'premium']". -
Invalid multichoice keys. Writing
{% if optional_services['onsite'] %}instead of['on_site']— the multichoice dict returns false for unknown keys, so the section silently disappears. Validation catches the mismatch against declared option values. -
Component wiring errors. When you get to Iteration 9, if you pass
signer_nme(typo) instead ofsigner_nameto a component, validation will report: "Input 'signer_nme' is not a declared input or question for component 'signature_block'". If you forget to pass a required input entirely, it reports that too. -
Tristate misuse. Using
{% if risk_flag %}on a tristate variable (which can be True, False, or "don't know") is ambiguous — validation warns that you should use{% if risk_flag is true %}instead.
The common thread is that these bugs are invisible at runtime until someone happens to enter the exact combination of answers that triggers the broken path. That could be weeks after the mistake was introduced. vibe validate finds them all in seconds.
The Development Loop
For day-to-day template authoring, the fastest workflow is:
- Edit your
config.ymlortemplate.md - Run
vibe validate service-agreement-tutorial - Fix any errors it reports
- Repeat until it says
valid - Only then start the server and test in the browser
This is much faster than switching to the browser, loading the interview, answering questions to reach the changed branch, and discovering the error there. Think of vibe validate as your first line of defense.
To make this even smoother, you can use watch mode:
This keeps running in the background and re-validates automatically every time you save a file. Leave it running in a terminal while you edit, and you'll see errors appear within a second of saving — no need to switch windows and run a command each time.
Part B: Test Scenarios
Features: tests.md file, vibe test command.
Static validation tells you whether the template is structurally sound. Test scenarios tell you whether it does what you intended. Validation catches typos and wiring errors; test scenarios catch logic mistakes like "the NDA section should appear when include_nda is Yes, not when it's No."
Step 1: Create the Test File
Create a file called tests.md next to your config.yml:
# Scenarios

## Base case — no NDA

> The simplest path: NDA disabled, no optional services.

**Answers:**

| Label                    | Answer   |
|--------------------------|----------|
| Client Name              | Acme Inc |
| Include NDA              | No       |
| Contract duration months | 12       |
| Service Level            | Standard |

**Relevant questions:**

- client_name
- include_nda

**Not relevant questions:**

- nda_term_months

**Document contains:**

- "Acme Inc"

**Document excludes:**

- "Confidentiality"

## With NDA enabled

> Turning on the NDA should reveal nda_term_months and
> add the Confidentiality section to the document.

**Answers:**

| Label                    | Answer   |
|--------------------------|----------|
| Client Name              | Acme Inc |
| Include NDA              | Yes      |
| NDA term months          | 24       |
| Contract duration months | 12       |
| Service Level            | Standard |

**Relevant questions:**

- nda_term_months

**Document contains:**

- "Confidentiality"
- "24"

## With on-site support

> Selecting on-site support should make on_site_location
> relevant and include the On-site Support section.

**Answers:**

| Label                    | Answer          |
|--------------------------|-----------------|
| Client Name              | Acme Inc        |
| Include NDA              | No              |
| Contract duration months | 12              |
| Service Level            | Standard        |
| Optional services        | On-site support |
| On-site location         | Stockholm       |

**Relevant questions:**

- on_site_location

**Document contains:**

- "On-site Support"
- "Stockholm"

**Document excludes:**

- "Data Migration"
Step 2: Run the Tests
From your VIBE project folder, run:
You should see output like:
Running tests for: service-agreement-tutorial
  Spec: tests.md (3 scenarios)
  [PASS] Base case — no NDA
  [PASS] With NDA enabled
  [PASS] With on-site support

Test Summary
  1 template(s), 3 scenarios: 3 passed, 0 failed
Understanding What Happened
Each scenario follows the same flow:
- VIBE feeds the answers from the Answers table into the interview engine and runs it headlessly (no browser needed).
- It checks which questions were asked (Relevant questions / Not relevant questions).
- It checks the rendered document for expected text (Document contains / Document excludes).
If any assertion fails, the scenario is marked [FAIL] with details about what went wrong. This makes it easy to catch regressions when you change your template later — run vibe test after every edit and you'll know immediately if something broke.
Assertion Reference
| Marker | What it checks |
|---|---|
| Relevant questions | Variable was asked during the interview |
| Not relevant questions | Variable was NOT asked |
| All relevant questions | Exactly these variables (and no others) were asked |
| Document contains | Rendered document includes this text |
| Document excludes | Rendered document does NOT include this text |
| Recommends | Template ID appears in recommendations |
| Does not recommend | Template ID does NOT appear |
| All recommendations | Exactly these template IDs (and no others) were recommended |
| Variables | Variable has an exact value (format: key = "value") |
See also: Template Testing
Iteration 6: Advanced Data & Text Formatting
Concept: Our contract duration is currently a simple number of months, but real-world agreements can be more complex. They might last until a specific date, be indefinite, or terminate upon a specific event. We will upgrade our contract_duration from a number to a flexible period type. We will also introduce linguistic filters to make our text more professional and grammatically correct.
Features: period and amount types; linguistic filters like |plural and |doublet.
Step 1: Upgrade contract_duration and Add New Questions
We will change the type of our existing contract_duration_months question to period and rename it. We'll also add a project_fee (amount) and a notice_period (number) that will only become relevant if the user chooses an event-based duration.
questions:
  # UPGRADE THIS QUESTION
  contract_duration: # Renamed from contract_duration_months
    type: period
    label: What is the duration of the contract?
    modes: ["duration", "event"] # Only allow these two modes
    default_mode: duration
    default_unit: months
    help: "Choose a fixed duration or an event that terminates the contract."

  # NEW QUESTION for project fee
  project_fee:
    type: amount
    label: One-Time Project Fee
    currencies: ["USD", "EUR", "GBP"]
    min: 0

  service_level:
    type: select
    label: Select the service level
    options:
      - Standard
      - Premium
      - Enterprise

  # NEW QUESTION that depends on the period's mode
  termination_notice_days:
    type: number
    label: How many days notice are required for termination for convenience?
    min: 1
    default: 30
Step 2: Update the Template with Advanced Logic
Now we'll update our template to handle the new period object and apply the linguistic filters.
The initial term of this agreement is
{% if contract_duration.mode == 'duration' %}
  for a period of **{{ contract_duration.quantity | doublet(unit=contract_duration.unit) }}**.
{% elif contract_duration.mode == 'event' %}
  until the event of **{{ contract_duration.event }}**. If this agreement is terminated for convenience, a notice period of **{{ termination_notice_days }}** days is required.
{% endif %}

The selected service level is: **{{ service_level }}**.

The total project fee is **{{ project_fee }}**.
What's Happening Here?
- Upgraded Question: The simple "number of months" input has been replaced by a sophisticated widget. The user can now choose between a fixed "Duration" (with a number and a unit) or an "Event" (with a text description).
- Conditional Relevance with
.mode: This is a key pattern. We check{% if contract_duration.mode == 'duration' %}to decide how to phrase the sentence. More importantly, the variable{{ termination_notice_days }}is now inside the{% if contract_duration.mode == 'event' %}block. VIBE understands this! The "notice period" question will remain hidden until the user explicitly selects the "Event" mode for the contract duration. - Smart Objects: The
periodobject is smart. We can access its parts like.mode,.quantity, or.unitto control the template logic. | doubletFilter: We're now using a linguistic filter on the duration quantity. If the user enters12, the output will be "twelve (12) months", which is common in formal contracts.| pluralFilter: This filter makes the heading grammatically correct. If there is only one deliverable, it will read "The following deliverable will be provided:". If there are more, it will correctly say "deliverables".
See also: Question Types Reference, Linguistic Template Features
Iteration 7: Handling Lists of Items and Reusable Data Structures
Concept: Now let's implement the list of project deliverables using reusable data structures.
Features: definitions:, list type with uses:, {% for %} loop.
Step 1: Define the Data Structure and List Question
First, we'll create a definitions block to define what a deliverable looks like, then use it in our list question.
definitions:
deliverable_definition:
name:
type: text
label: Deliverable Name
description:
type: textarea
label: Description
required: false
questions:
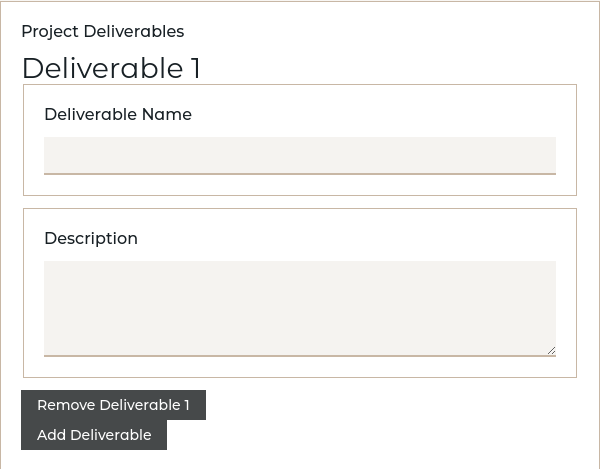
project_deliverables:
type: list
label: Project Deliverables
item_label: Deliverable # The label for the "Add" button
uses: deliverable_definition # References the definition above
Step 2: Render the List in the Template
Use a {% for %} loop to print each item the user adds.
The following {{ "deliverable" | plural(if_=project_deliverables|length) }} will be provided:
<ul>
{% for item in project_deliverables %}
  <li><strong>{{ item.name }}:</strong> {{ item.description }}</li>
{% endfor %}
</ul>
When the user runs the interview, they will see an "Add Deliverable" button. Each time they click it, a new form with "Deliverable Name" and "Description" fields will appear.
See also: Reusable Data with definitions, Template Authoring Guide
Iteration 8: Structured Data with definitions
Concept: Now that we've seen how definitions work with lists, let's use them for structured single objects too. We'll add a client contact using the structured type.
Features: structured type with definition:.
Step 1: Add a Person Definition and Structured Question
Add a new definition for person data and use it in a structured question.
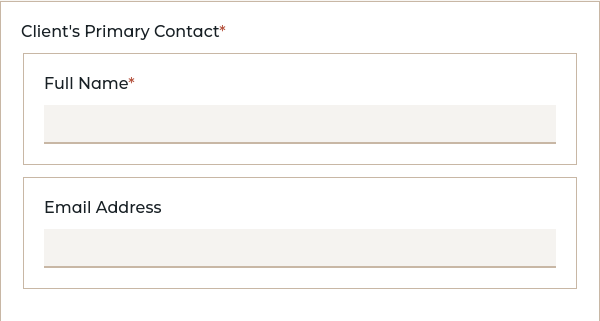
definitions:
  person_definition:
    full_name:
      type: text
      label: Full Name
    email:
      type: email
      label: Email Address
      required: false

questions:
  client_contact:
    type: structured
    label: Client's Primary Contact
    definition: person_definition
Step 2: Use the Structured Data in the Template
Access the structured fields using dot notation.
The primary contact for the client will be **{{ client_contact.full_name }}** ({{ client_contact.email }}).
By using definitions for both list and structured types, we've made our data structures explicit, reusable, and much easier to maintain.
See also: Reusable Data with definitions
Iteration 9: Modular Documents with Components
Concept: Just as definitions let us reuse data structures, components let us reuse parts of our document. We will extract our signature block into a separate, reusable component.
Features: component.yml, inputs, {{ insert() }}.
Step 1: Create the Component Files
- In your
service-agreement-tutorialfolder, create a new subfolder calledcomponents. - Inside
components, create another folder calledsignature_block. - Inside
signature_block, create two files:component.ymlandtemplate.md.
Your folder structure should look like this:
service-agreement-tutorial/
├── components/
│ └── signature_block/
│ ├── component.yml
│ └── template.md
├── config.yml
└── template.md
Step 2: Define the Component's Interface
A component's inputs declare what data it expects to receive from the main template.
# In components/signature_block/component.yml

inputs:
  signer_name:
    type: text
    description: "The full name of the person signing."
Step 3: Create the Component's Content
Step 4: Use the Component in the Main Template
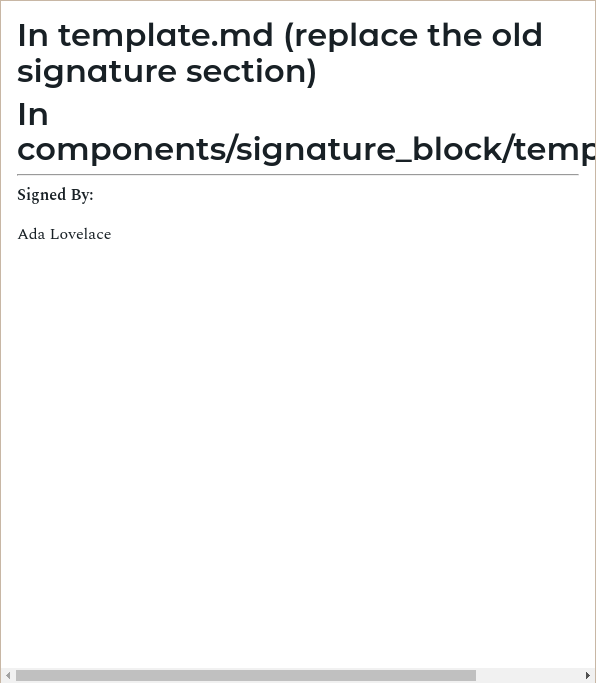
Now, replace the old signature text in your main template.md with an insert() function. We pass the value of client_contact.full_name into the component's signer_name input.
# In template.md (replace the old signature section)

{{ insert('signature_block', signer_name=client_contact.full_name) }}
Note: For VIBE to find your new component, your system administrator must add your components folder to the main VIBE config.yml COMPONENT_SOURCES list. For this tutorial, we'll assume that's been done.
See also: Reuse with Components
Iteration 10: Automated Calculations with computables
Concept: Deriving data instead of asking for it. We'll add an estimated project cost that is calculated from an amount's numeric value and a number.
Features: computable, compute.
Step 1: Add the Computable and its Dependencies
We need an hourly rate (as an amount) and estimated hours (number), then define a computable to multiply them.
# In config.yml (add to your questions block)

questions:
  hourly_rate:
    type: amount
    label: Hourly Rate
    currencies: ["USD", "EUR"]
    min: 0

  estimated_hours:
    type: number
    label: Estimated Project Hours
    min: 1

  estimated_project_cost:
    type: computable
    compute: "hourly_rate.value * estimated_hours"
Note that we use hourly_rate.value to extract the numeric value from the amount object. The amount type stores both a .value (the number) and a .currency (the currency code), so arithmetic operations must be done on the numeric value directly.
Step 2: Use the Computable in the Template
The computable variable estimated_project_cost is a plain number (the result of the multiplication), so you can format it alongside the currency information from the original amount.
# In template.md

## Estimated Cost

Based on an hourly rate of **{{ hourly_rate }}** and an estimate of **{{ estimated_hours }}** hours, the total estimated project cost is **{{ estimated_project_cost }}**.
The compute expression runs in a sandboxed environment with access to your template variables. You can use standard Python arithmetic operators and a set of safe built-in functions like round, min, max, and abs.

See also: Automated Calculations with Computable Variables
Iteration 11: Generating Separate Documents with Appendices
Concept: Let's create a separate Service Level Agreement (SLA) document that is only generated if the user selected the "Premium" service level.
Features: Component with output: key, {{ appendix() }} function.
Step 1: Create the Appendix Component
Create a new component just like before.
Folder Structure:
components/sla_appendix/component.yml:
The output: key is what makes this a separate appendix file.
# The `output` key marks this as an appendix.
output: "Appendix-{{ ref.numbering }}-Service-Level-Agreement.docx"
label: Service Level Agreement

questions:
  uptime_guarantee:
    type: number
    label: Uptime Guarantee (%)
    min: 99
    max: 99.99
    default: 99.9
components/sla_appendix/template.md:
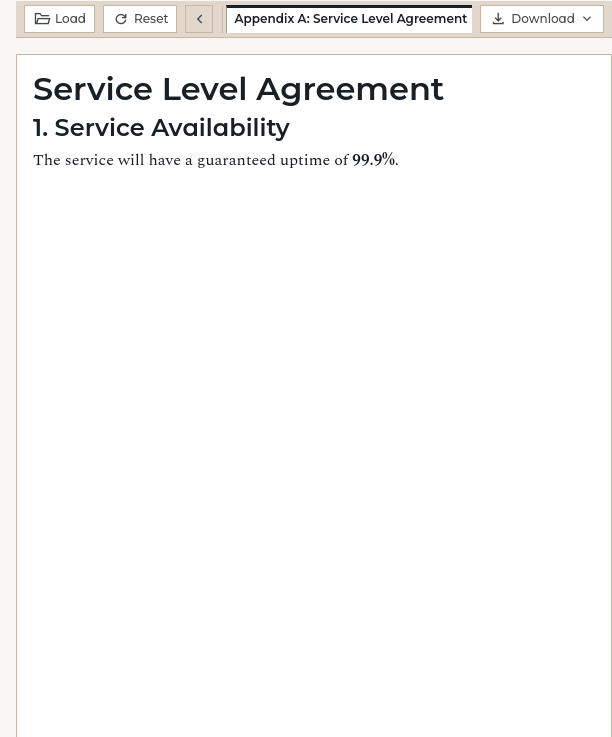
# Service Level Agreement

## 1. Service Availability

The service will have a guaranteed uptime of **{{ uptime_guarantee }}%**.
Note: The {{ ref.numbering }} and {{ ref.label }} variables are available in the output: filename pattern (for generating the download filename), but not inside the template content itself. Use them in output: to create descriptive filenames like Appendix-A-Service-Level-Agreement.docx.
Step 2: Use the appendix() Function in the Main Template
The appendix() function registers the appendix and gives you a reference object to use.
# In template.md

# Main Agreement

{% if service_level == 'Premium' %}
  {% set sla_ref = appendix('sla_appendix', alias='main_sla') %}
{% endif %}

{% if sla_ref is defined %}
## Appendices
The following appendices are attached to and form an integral part of this agreement:
- Appendix {{ sla_ref.numbering }}: {{ sla_ref.label }}
{% endif %}
See it Work!
Now when you run the interview and select the "Premium" service level:
- A new group of questions for the "Service Level Agreement" will appear in the interview.
- A new tab will appear in the preview area showing the rendered SLA document.
- The "Download" button will become a dropdown, allowing you to download the main document, the appendix, or a
.zipfile containing both.
See also: Generating Appendices and Annexes
Conclusion
Congratulations! You have just built a sophisticated, modular, and dynamic VIBE template.
You've journeyed from a simple text replacement to a multi-document package with conditional logic, lists, reusable components, and automatic calculations.
From here, you can explore the other guides in this documentation to learn about more advanced features and best practices.
Next references: Template Authoring Guide, Question Types Reference, Template Metadata Reference